
woiden 纯IPV6节点搭建

woiden 纯IPV6节点搭建
Diving YuWoiden 纯IPV6 VPS节点搭建教程
获取Woiden免费VPS
通过Woiden注册一个免费的纯ipv6服务器,
需要
我选择的是Debian GNU/Linux 11系统
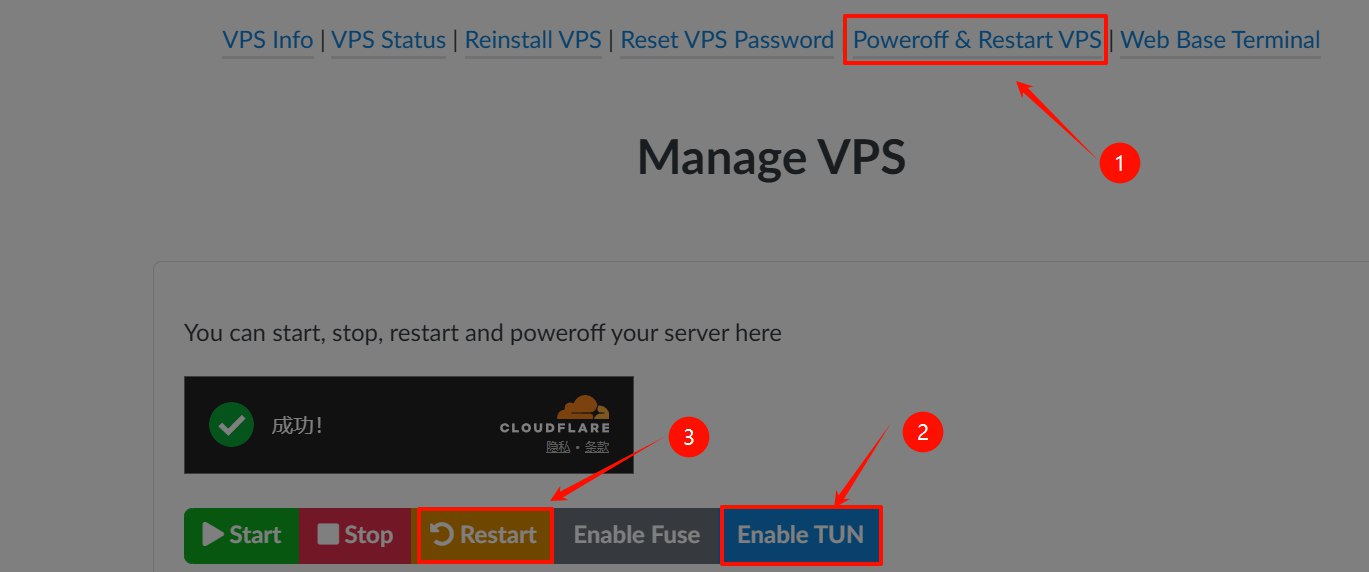
环境准备
先打开
TUN , 打开后需要重启.
设置
DNS64 1
echo -e "nameserver 2606:4700:4700::64\nnameserver 2001:67c:2b0::4\nnameserver 2001:4860:4860::64\n" > /etc/resolv.conf
更新和升级相关依赖
1
2
3
apt update && apt upgrade
apt install curl
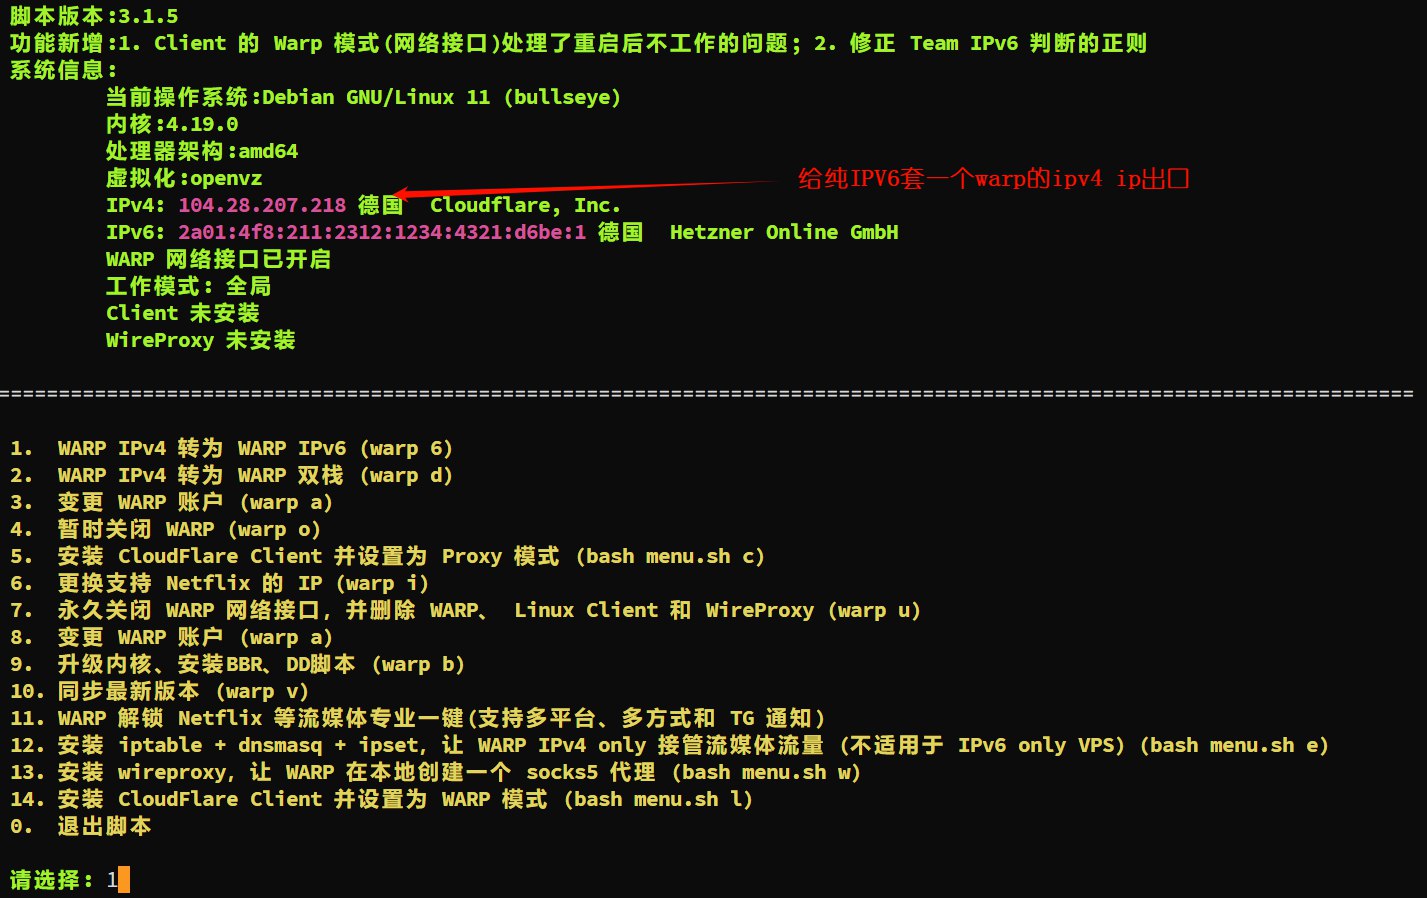
wget -N https://gitlab.com/fscarmen/warp/-/raw/main/menu.sh && bash menu.sh输入
warp给ipv6套一个ipv4出口检查
IP Info 1
2
3
4
5
6# 检查ipv6的信息
curl -6 ip.p3terx.com
# 检查ipv4的信息
curl -4 ip.p3terx.com
# 如果显示ipv6,则表明ipv6优先; 如果显示ipv4,则表明ipv4优先
curl ip.p3terx.com
服务器入站配置
按照自己VPS架构, 选择最新的Sing-box
1
2
3
4
5
6## 最新稳定版
curl -fsSL https://sing-box.app/install.sh | sh
## 最新测试版:
curl -fsSL https://sing-box.app/install.sh | sh -s -- --beta
## 指定版本:
curl -fsSL https://sing-box.app/install.sh | sh -s -- --version <version>配置入站节点
生成临时证书
1
openssl req -x509 -nodes -newkey ec:<(openssl ecparam -name prime256v1) -keyout server.key -out server.crt -subj "/CN=bing.com" -days 36500
创建
config.json文件,内容如下(根据自己情况修改):当前创建
hysteria2和vmess-ws-argo入站配置1
2
3
4
5
6
7
8
9
10
11
12
13
14
15
16
17
18
19
20
21
22
23
24
25
26
27
28
29
30
31
32
33
34
35
36
37
38
39
40
41
42
43
44
45
46
47
48
49
50
51
52
53
54
55{
"log": {
"disabled": true,
"level": "info",
"timestamp": true
},
"inbounds": [
{
"type": "hysteria2",
"listen": "::",
"listen_port": 12833,//需要修改
"users": [
{
"password": ""//./sing-box generate uuid 或者./sing-box generate rand 16 --base64
}
],
"masquerade": "https://www.bing.com",//可以修改
"ignore_client_bandwidth": false,
"tls": {
"enabled": true,
"alpn": [
"h3"
],
"certificate_path": "/root/singbox/server.crt",//填写上一步生成的自签证书路径
"key_path": "/root/singbox/server.key"//填写上一步生成的自签证书路径
}
},
{
"type": "vmess",
"tag": "vmess-ws-argo",
"listen": "::",
"listen_port": 13842,//需要修改
"users": [
{
"name": "diving",//可修改,可不要
"uuid": "",////./sing-box generate uuid 或者./sing-box generate rand 16 --base64
"alterId": 0
}
],
"transport": {
"type": "ws",
"path": "/swuhwueh",//需修改
"headers": {},
"max_early_data": 0,
"early_data_header_name": "Sec-WebSocket-Protocol"
}
}
],
"outbounds": [
{
"type": "direct",
"tag": "direct"
}
]
}运行
sing-box,检测连通性1
./sing-box run config.json
添加到
systemctl,配置开机自启动cd /etc/systemd/systemvi sing-box.service,根据自己情况修改1
2
3
4
5
6
7
8
9
10
11
12
13
14
15
16
17[Unit]
Description=sing-box service
Documentation=https://sing-box.sagernet.org
After=network.target nss-lookup.target
[Service]
CapabilityBoundingSet=CAP_NET_ADMIN CAP_NET_BIND_SERVICE CAP_SYS_PTRACE CAP_DAC_READ_SEARCH
AmbientCapabilities=CAP_NET_ADMIN CAP_NET_BIND_SERVICE CAP_SYS_PTRACE CAP_DAC_READ_SEARCH
ExecStart=/root/singbox/sing-box run --config /root/singbox/config.json
ExecReload=/bin/kill -HUP $MAINPID
Restart=on-failure
RestartSec=10s
LimitNPROC=512
LimitNOFILE=infinity
[Install]
WantedBy=multi-user.target添加自启动,检查运行状态
1
2
3
4
systemctl daemon-reload
systemctl enable --now sing-box
systemctl restart sing-box
systemctl status sing-box
添加Argo隧道
根据自己的系统和架构下载最新的cloudfared版本
1
wget https://github.com/cloudflare/cloudflared/releases/download/2025.7.0/cloudflared-linux-amd64
1
2
3
4
## 我将cloudflared移动到singbox下的conf文件夹里面
mkdir conf
mv cloudflared-linux-amd64 cloudflared
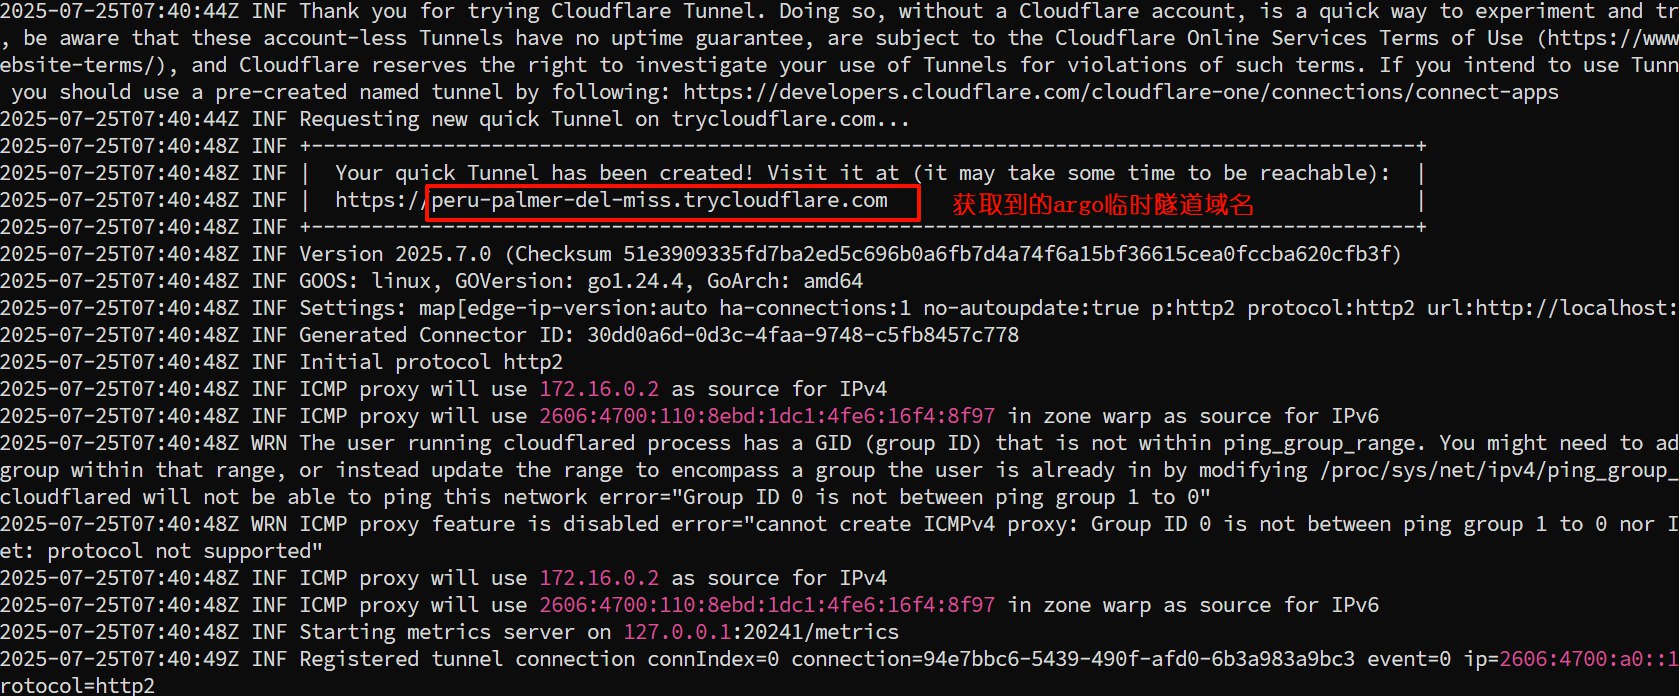
mv cloudflared conf/添加临时隧道(不需要拥有自己的域名, 每次重新运行隧道进程, 隧道域名就会变. 与
固定域名二选一 )端口
13842 为sing-box的配置文件config.json里vmess-ws-argo 节点的端口. (cloudflared其他参数--logfile domain.log,--loglevel info,>/dev/null 2>&1 &)1
./cloudflared tunnel --url http://localhost:13842 --edge-ip-version auto --no-autoupdate --protocol http2
获取
argo 临时隧道域名
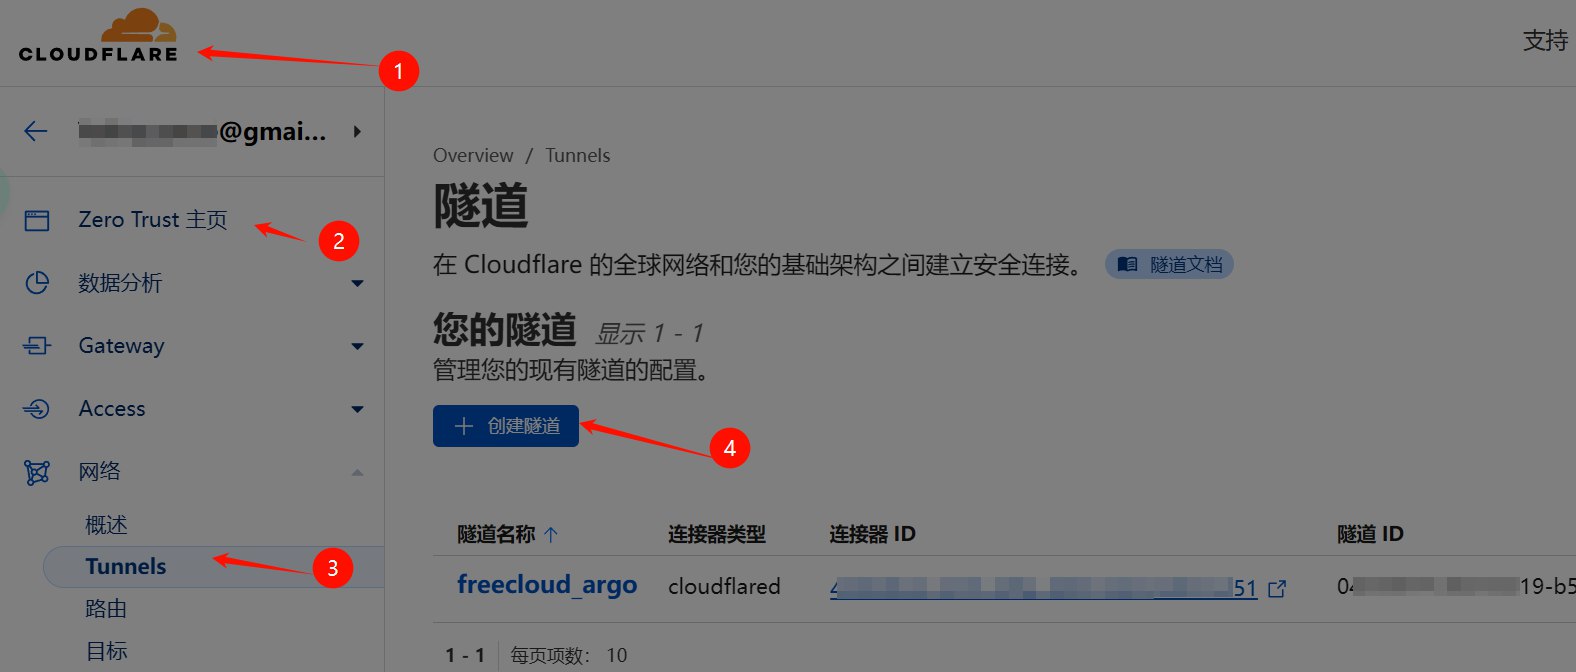
添加固定隧道(每次运行隧道域名不会变,需要在cloudflare上挂有自己的域名. 与
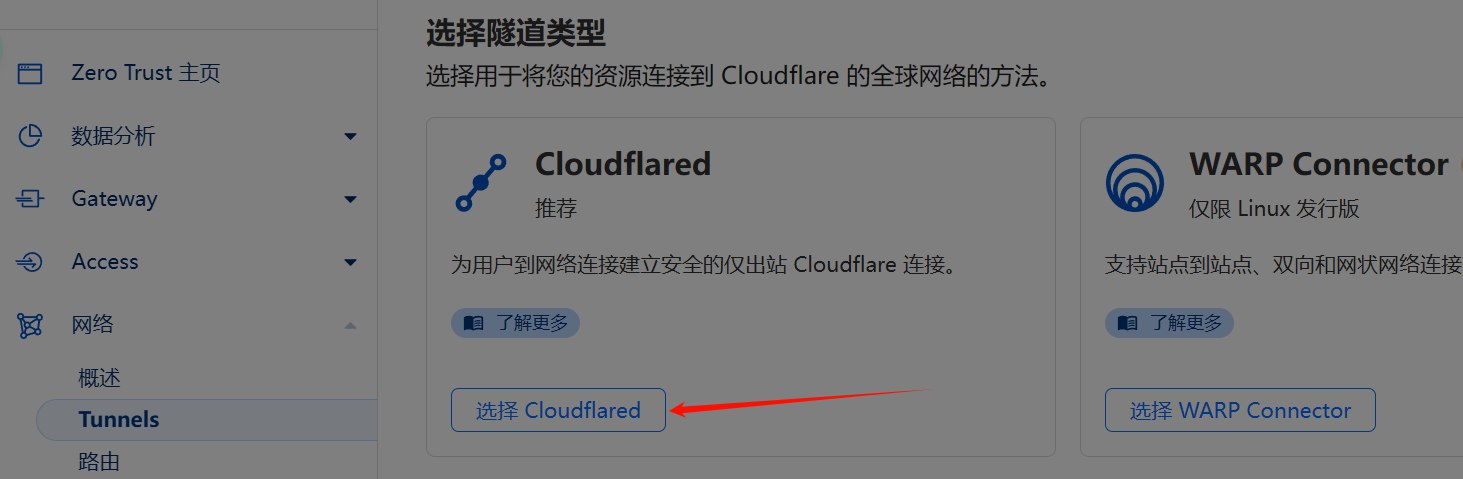
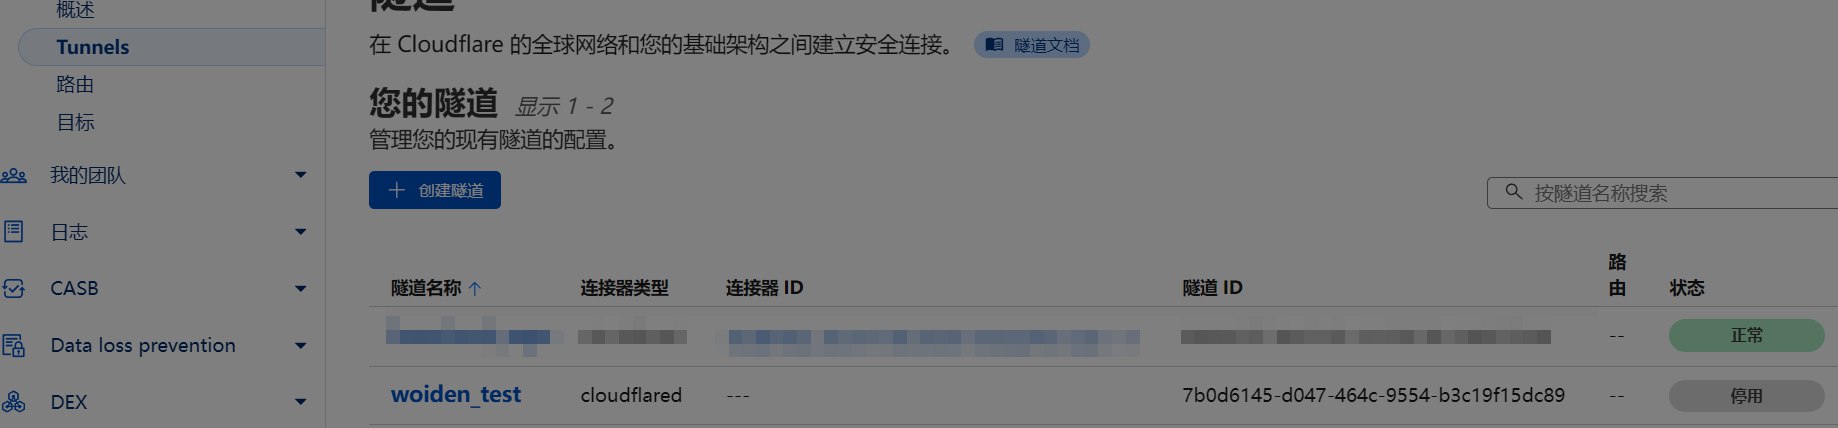
临时域名二选一 )点击cloudflare, 进入Zero Trust, 选择网络,再点击Tunnels,然后创建隧道.
创建隧道类型选择Cloudflared
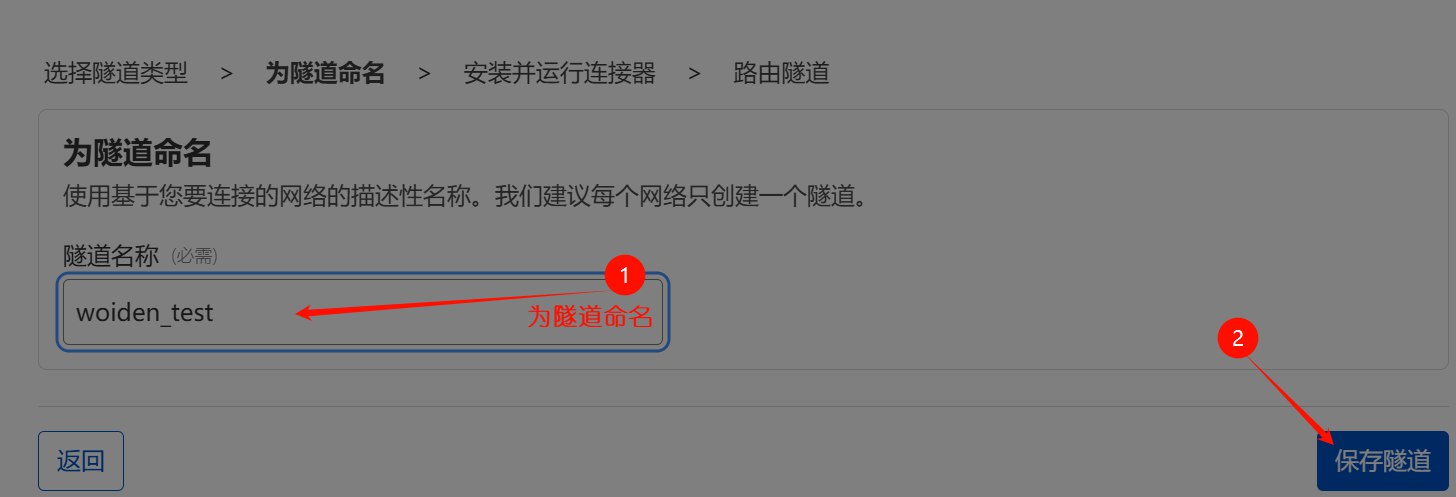
为隧道命名,然后保存隧道
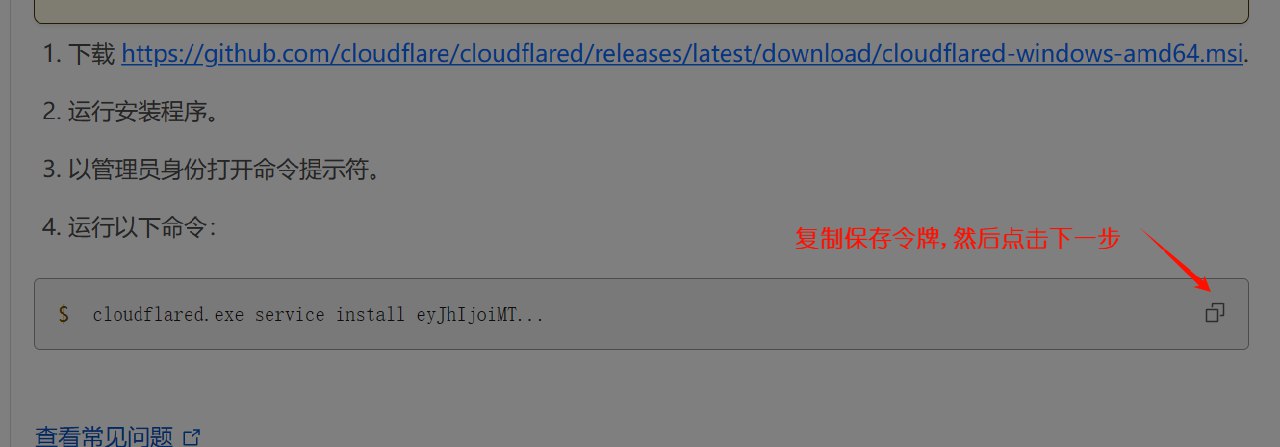
保存cloudflared令牌, 然后点击下一步
1
cloudflared.exe service install eyJhIjoiMTc2MzA2NjdhMDMyZDYyOTUyYzdmNjlhYjkzZmRhMTQiLCJ0IjoiN2IwZDYxNDUtZDA0Ny00NjRjLTk1NTQtYjNjMTlmMTVkYzg5IiwicyI6IlptSmpaRGRrTkRZdFpUWTNOeTAwT1RJM0xXSTFZMkV0TmpZd09UUTFOelU1T1dJMiJ9
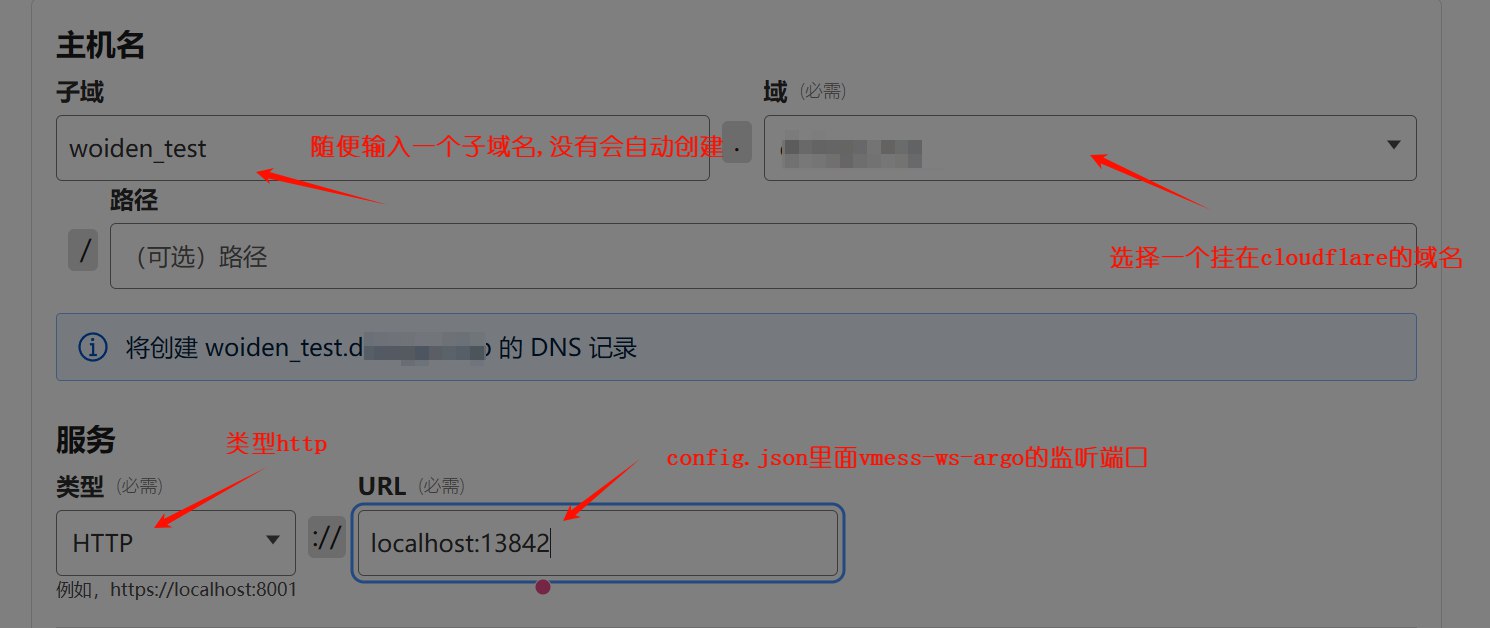
创建路由流量, 按下图设置, 然后点击完成设置
回到Tunnels, 可以看到
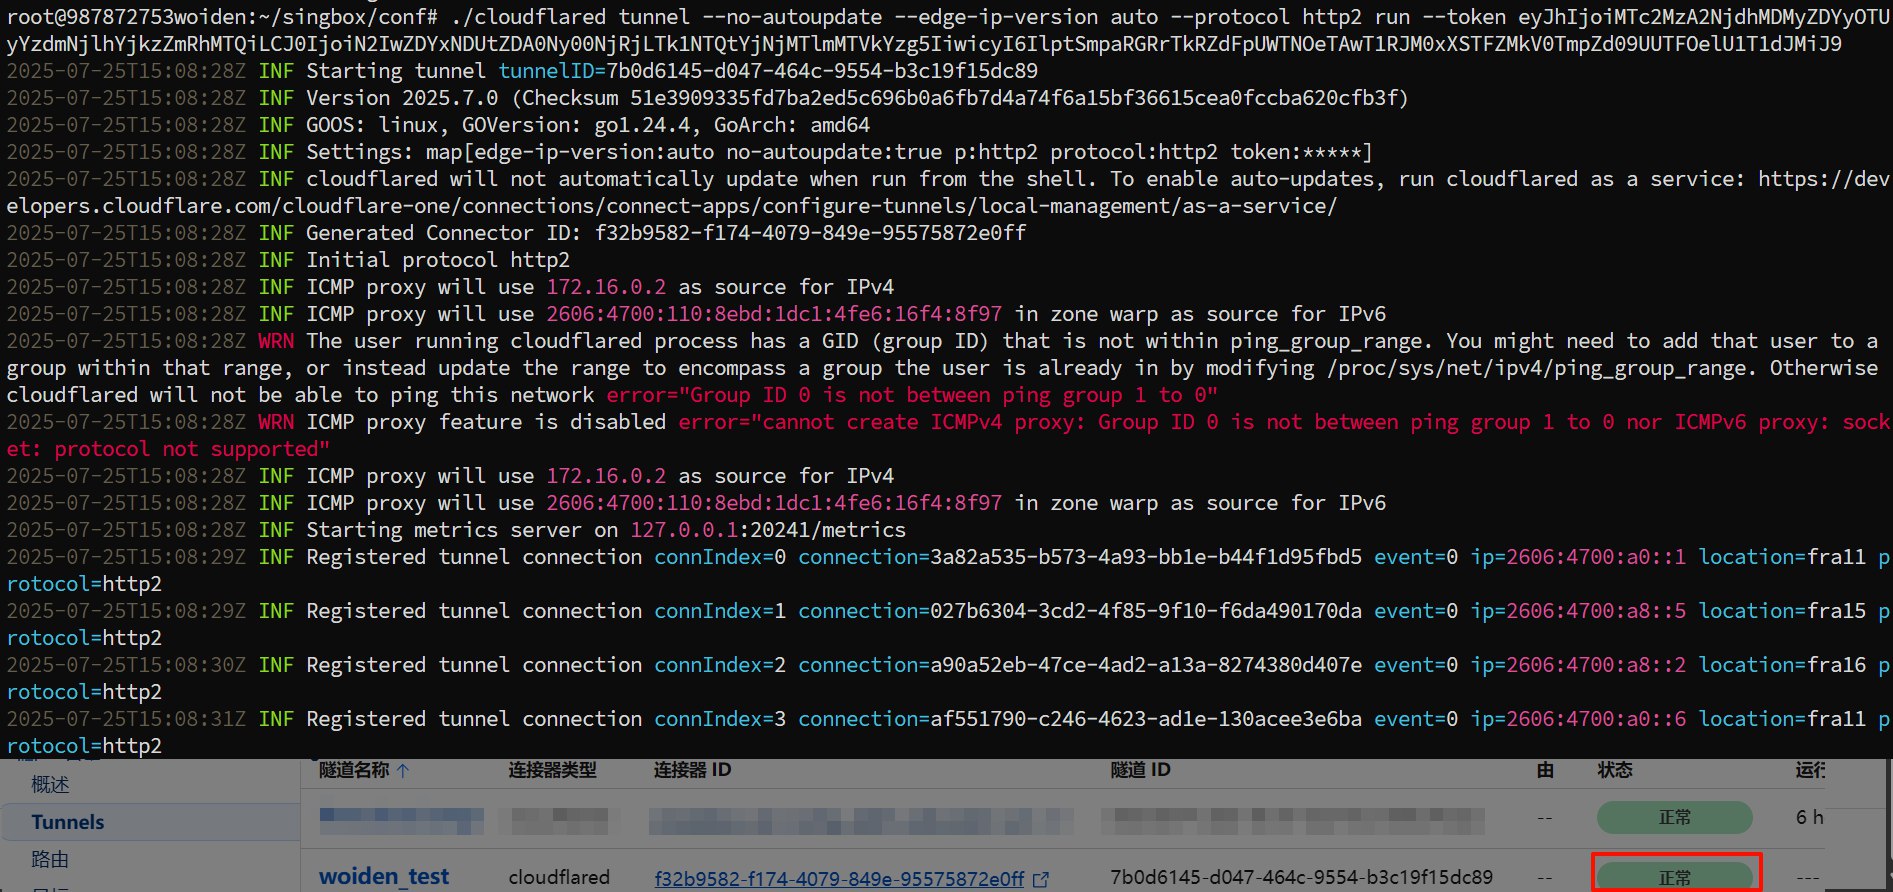
woiden_test隧道以及创建成功, 目前状态是停用回到服务器,启动cloudflared固定隧道, 回到cloudflare隧道页面可以看到woiden_test隧道运行正常
1
./cloudflared tunnel --no-autoupdate --edge-ip-version auto --protocol http2 run --token eyJhIjoiMTc2MzA2NjdhMDMyZDYyOTUyYzdmNjlhYjkzZmRhMTQiLCJ0IjoiN2IwZDYxNDUtZDA0Ny00NjRjLTk1NTQtYjNjMTlmMTVkYzg5IiwicyI6IlptSmpaRGRrTkRZdFpUWTNOeTAwT1RJM0xXSTFZMkV0TmpZd09UUTFOelU1T1dJMiJ9
添加到
systemctl自启动路径cd /etc/systemd/systemvi cloudflared.service,根据自己情况修改1
2
3
4
5
6
7
8
9
10
11
12
13
14
15
16
17
18
19[Unit]
Description=cloudflared service
After=network.target nss-lookup.target
[Service]
CapabilityBoundingSet=CAP_NET_ADMIN CAP_NET_BIND_SERVICE CAP_SYS_PTRACE CAP_DAC_READ_SEARCH
AmbientCapabilities=CAP_NET_ADMIN CAP_NET_BIND_SERVICE CAP_SYS_PTRACE CAP_DAC_READ_SEARCH
ExecStartPre=/bin/bash -c 'echo "" > /root/singbox/conf/argo.log'
ExecStart=/root/singbox/conf/cloudflared tunnel --url http://localhost:13842 --edge-ip-version auto --no-autoupdate --protocol http2
ExecReload=/bin/kill -HUP $MAINPID
StandardOutput=append:/root/singbox/conf/argo.log
StandardError=append:/root/singbox/conf/argo.log
Restart=on-failure
RestartSec=10s
LimitNPROC=512
LimitNOFILE=infinity
[Install]
WantedBy=multi-user.target添加自启动, 检查运行状态
1
2
3
4
systemctl daemon-reload
systemctl enable cloudflared.service
systemctl restart cloudflared.service
systemctl status cloudflared.service
客户端配置
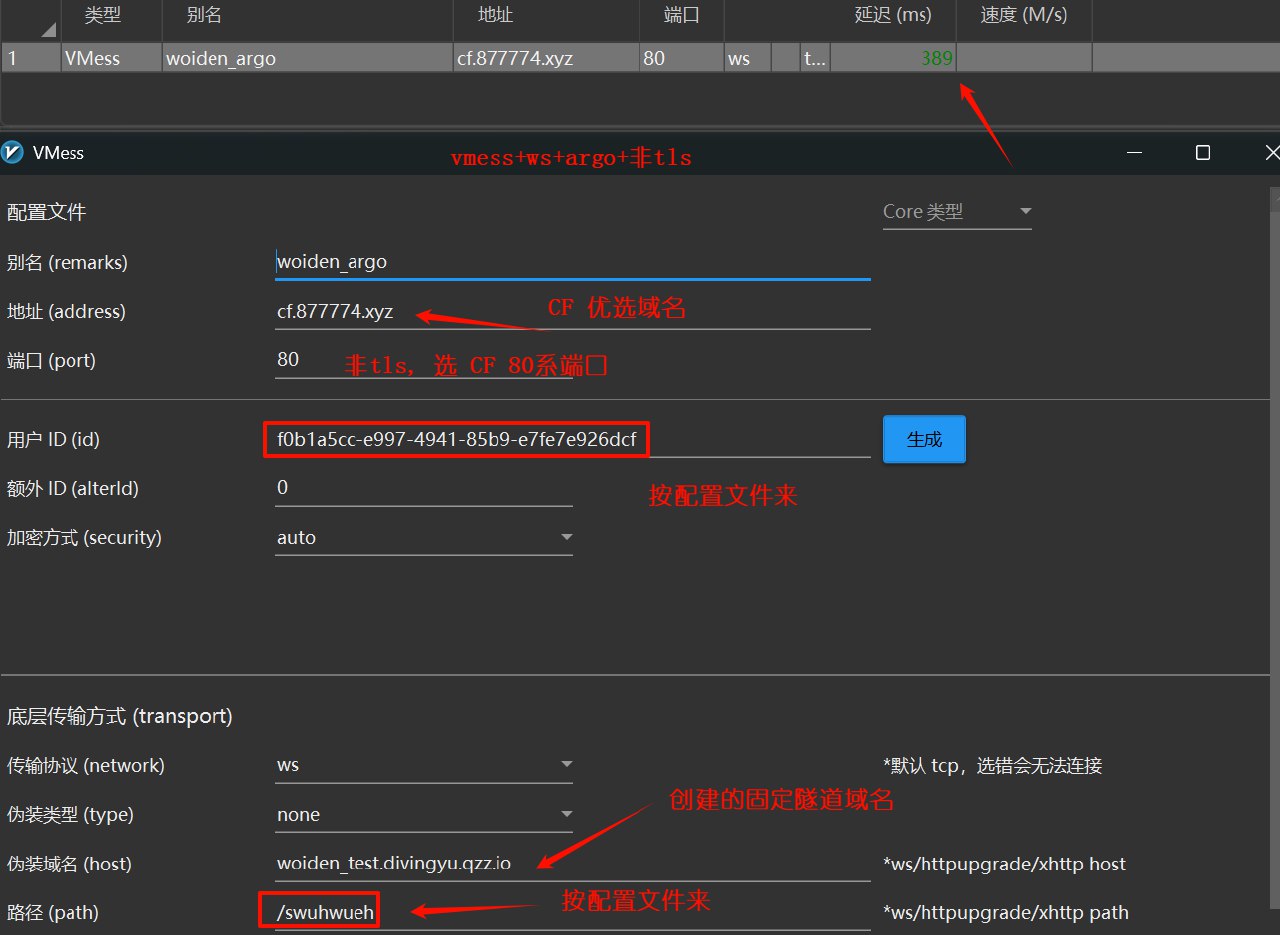
vmess+ws+argo+非tls
1 | # CF 80系端口 |
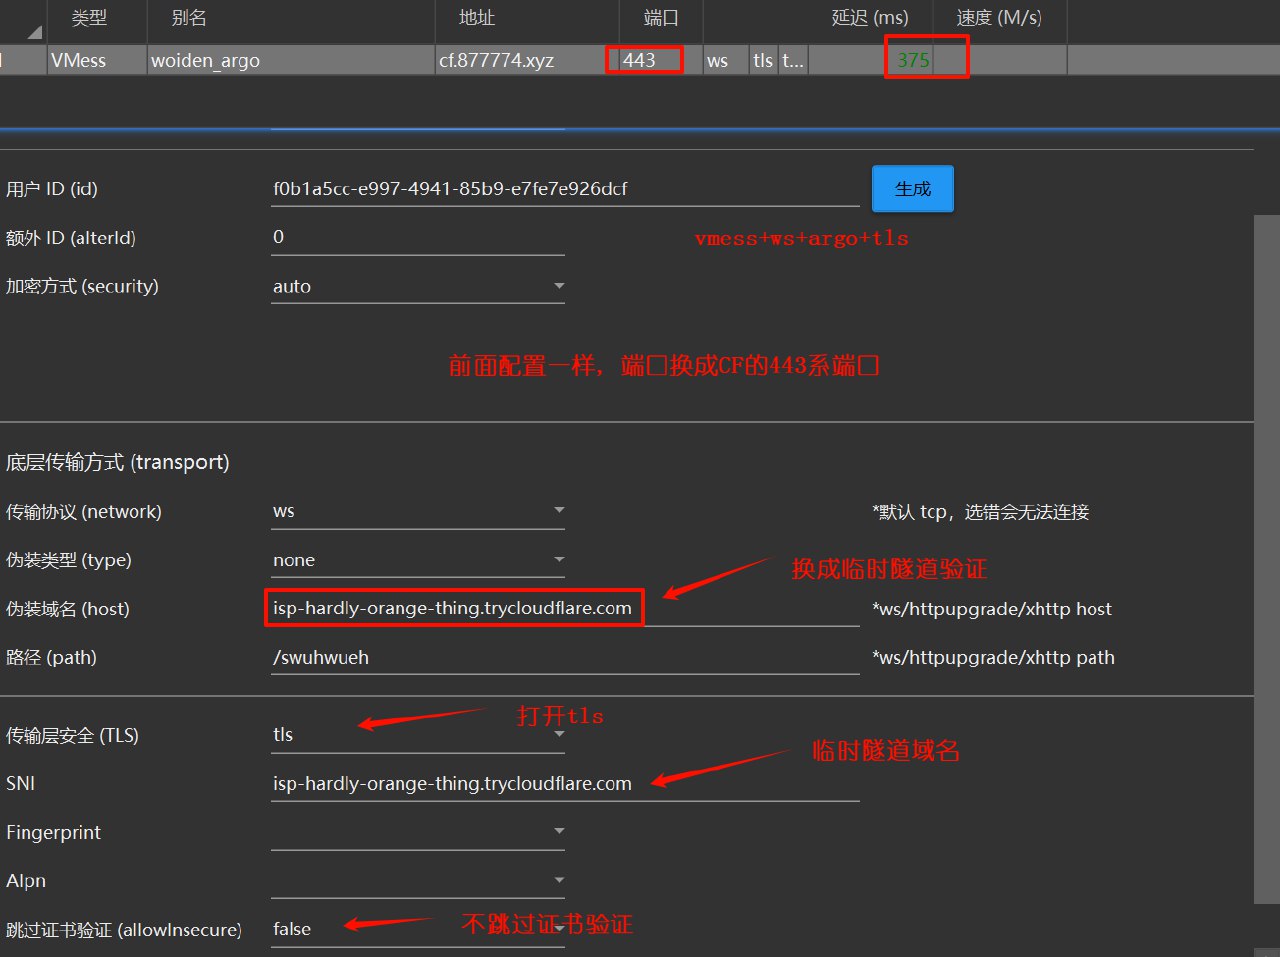
vmess+ws+argo+tls
1 | # CF 443系端口 |
hysteria2
此处省略并参考hysteria2文章配置
CF优选IP
1 | *.cf.cname.vvhan.com |